Nextcloud and Paperless-ngx in Multi-user Operation
Nextcloud and Paperless-ngx in Multi-user Operation
The two open source solutions complement each other in joint operation. While Paperless-ngx automatically captures and processes documents, Nextcloud handles the synchronization and storage of documents. This article presents the setup for multi-user operation.

Basic Requirements
As described in the last article, Nextcloud and Paperless-ngx should ideally be operated on the same server. This allows Paperless-ngx folders to be integrated into Nextcloud as local external storage. The setup is explained step by step below.
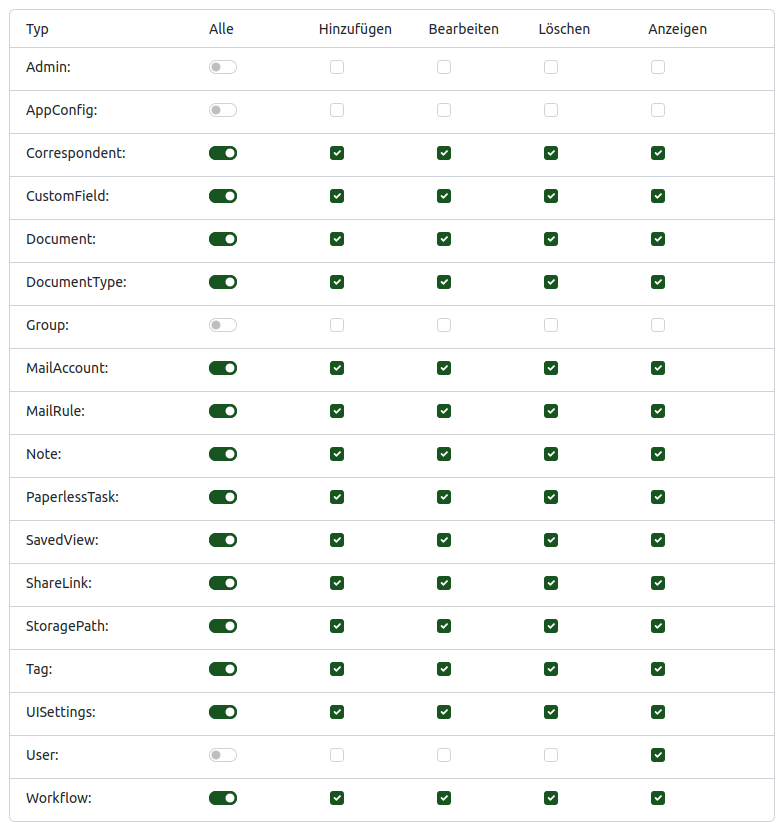
1. Creating a Group
First, create a new group called “Users“ in Paperless-ngx. To do this, click on “Users & Groups - Add Group“ at the bottom left.
The user group does not receive admin and group rights. Under “User“, only the “View“ option needs to be checked.
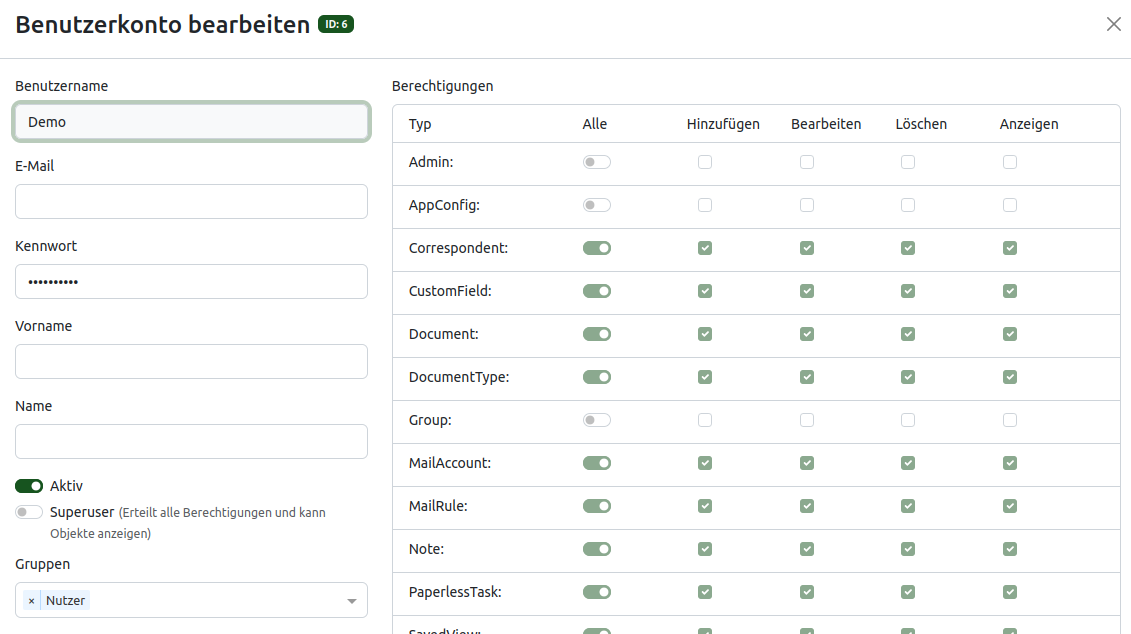
2. Adding Users
Create users for Paperless-ngx, ideally with the same usernames as in your Nextcloud. Add these users to the “Users“ group.
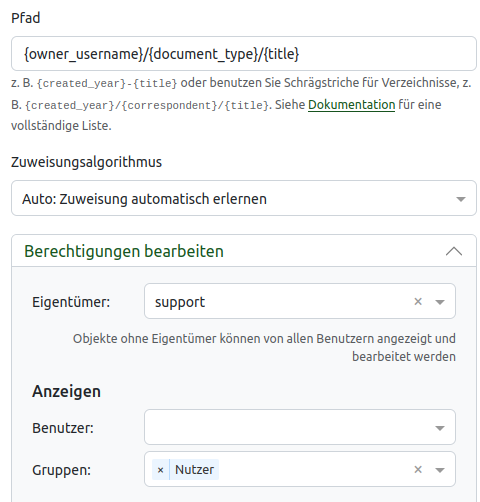
3. Adding a Storage Path
Click on “Storage Paths - Create“ in the left menu to define a new storage path. By adding placeholders, you can specify the folder structure to be used by Paperless-ngx. It‘s important to set the {“{owner_username}/“} placeholder first so that documents are stored in the respective user directory.
With this path, a new folder with the document type is created in the user directory, and the document is saved with the title as the name.
{“{owner_username}/{document_type}/{title}“}
Under permissions, the administrator is set as the owner. The “Users“ group receives view rights.
A list of all placeholders can be found here:
https://docs.paperless-ngx.com/advanced_usage/#placeholders
4. Integrating Paperless-ngx Consume Folder
For the next step, the corresponding folders must first be created in the “consume“ folder of Paperless-ngx.
To do this, click on “Administration Settings - External Storage“ in your Nextcloud and add a local external storage. For the storage path, enter the consume folder, e.g., /opt/paperless-ngx/consume/Demo.
(The path may vary depending on the installation, and the corresponding folder must already be created)
This folder should only be shared with the administrator.

Then create the folders for the users.

5. Creating Workflows
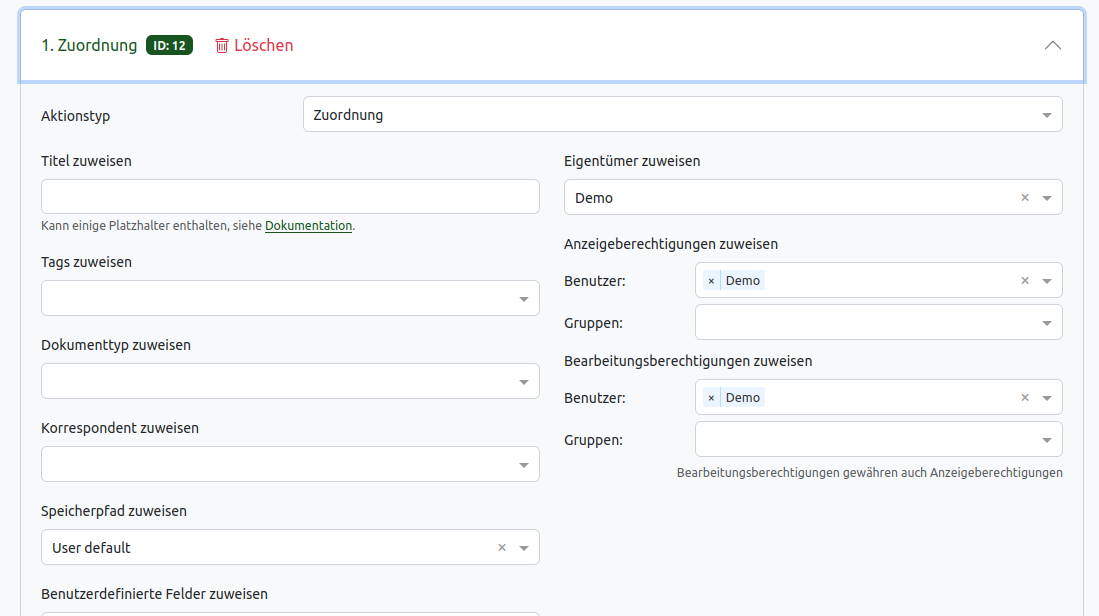
Next, a workflow is created for each user. To do this, click on “Workflows - Add Workflow“ in the left menu.
The workflow is necessary so that documents from Nextcloud can also be loaded into Paperless-ngx.
It‘s best to use the respective username as the name.
- Trigger type: Processing started
- Path: /usr/src/paperless/consume/Demo/*
(The path may vary depending on the installation, and the corresponding folder must already be created)

For the action type, select “Assignment“ and choose the storage path you just created. For owner, view permissions, and edit permissions, select the user for whom the workflow is being created.
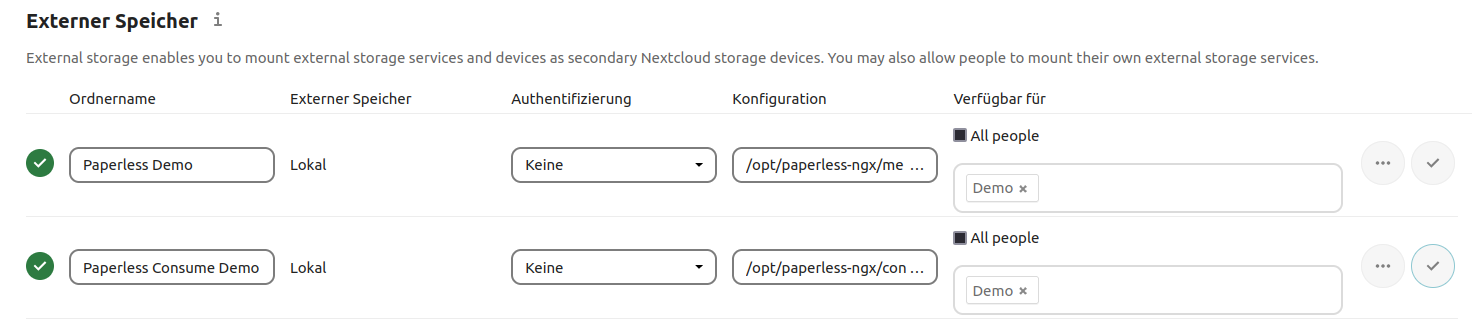
6. Adding External Storage for Users
For each user to see their Paperless-ngx folders in Nextcloud, these must be integrated as external storage. To do this, click on “Administration Settings - External Storage“ in your Nextcloud. Create a folder “Paperless Documents“ with the storage path /opt/paperless-ngx/media/documents/archive/Demo
...and a “Paperless Input“ folder with this storage path: /opt/paperless-ngx/consume/Demo
Please note that the storage paths may vary depending on the installation.
Result
After successful setup, each Nextcloud user has two personal Paperless-ngx folders. The “Consume“ folder, in which documents can be easily loaded into Paperless-ngx via drag & drop, and the “Paperless“ folder, in which all documents with the Paperless-ngx folder structure can be seen. In Paperless-ngx, each user has their personal area with their documents that they can upload and edit.
As a PathConnect customer, we take care of the complete setup and specific settings for you.
Open Source Software at PathConnect
Simply select and get started. We customize the software exactly to your needs, take care of maintenance, and provide you with personal support. Our offer includes a variety of open source solutions that can be perfectly tailored to your requirements. Enjoy the comfort of an all-around service that includes installation, customizations, and updates, so you can focus entirely on your projects.
Related Articles
Nextcloud Kalender – Die wichtigsten Funktionen im Überblick
Der Nextcloud-Kalender ermöglicht dir eine einfache und datenschutzfreundliche Organisation von Terminen, Meetings und Ressourcen. Im Folgenden stellen wir dir die zentralen Funktionen vor, die deine tägliche Zusammenarbeit erleichtern.
Nextcloud Whiteboard - Creative Work in the Cloud
Whether brainstorming in a team, sketching new ideas, or creating an overview - with Nextcloud Whiteboard you can work creatively in the cloud. This article introduces the app and shows its most important features.
Paperless-ngx: OAuth2 für Microsoft 365 einrichten
Paperless-ngx kann Anhänge aus E-Mail-Postfächern automatisch verarbeiten. Damit dies auch mit einem Microsoft 365 Konto funktioniert, müssen einige Einstellungen vorgenommen werden. In diesem Artikel zeigen wir, was zu tun ist, damit die Anbindung funktioniert.